
In this post we review one of the new features in the recently released Veeam Backup & Replication 11a, which adds console-based management from Veeam Backup & Replication for the Unix agents, Veeam Agent for Solaris and Veeam Agent for AIX.
Where to download Veeam 11a#
As always, we start by reviewing the official documentation to learn what’s new in this release, along with any limitations tied to specific environments. To do that, we’ll visit the following pages:
Veeam Backup & Replication 11a
Veeam ONE 11a
New versions of the other Veeam solutions have also been released, such as Veeam Backup for AWS v4. For more information on the remaining updates, visit veeam.com
As KB4215 shows, this release introduces centralized management of the Unix, Solaris and AIX agents, so we’ll walk through how to install, configure and manage the agents from the VBR console and its corresponding protection group.
Protection Group#
From the Inventory menu, under Physical Infrastructure, we create a new Protection Group. After naming it, we select “Computers with pre-installed agents”

With that option selected, we choose “Export Path” and enter the folder where the agents will be placed (in my case only Solaris - Intel, but you can select whichever you need) for the configuration that follows, then click “Apply”

The Status is then displayed


Reviewing the Installers#
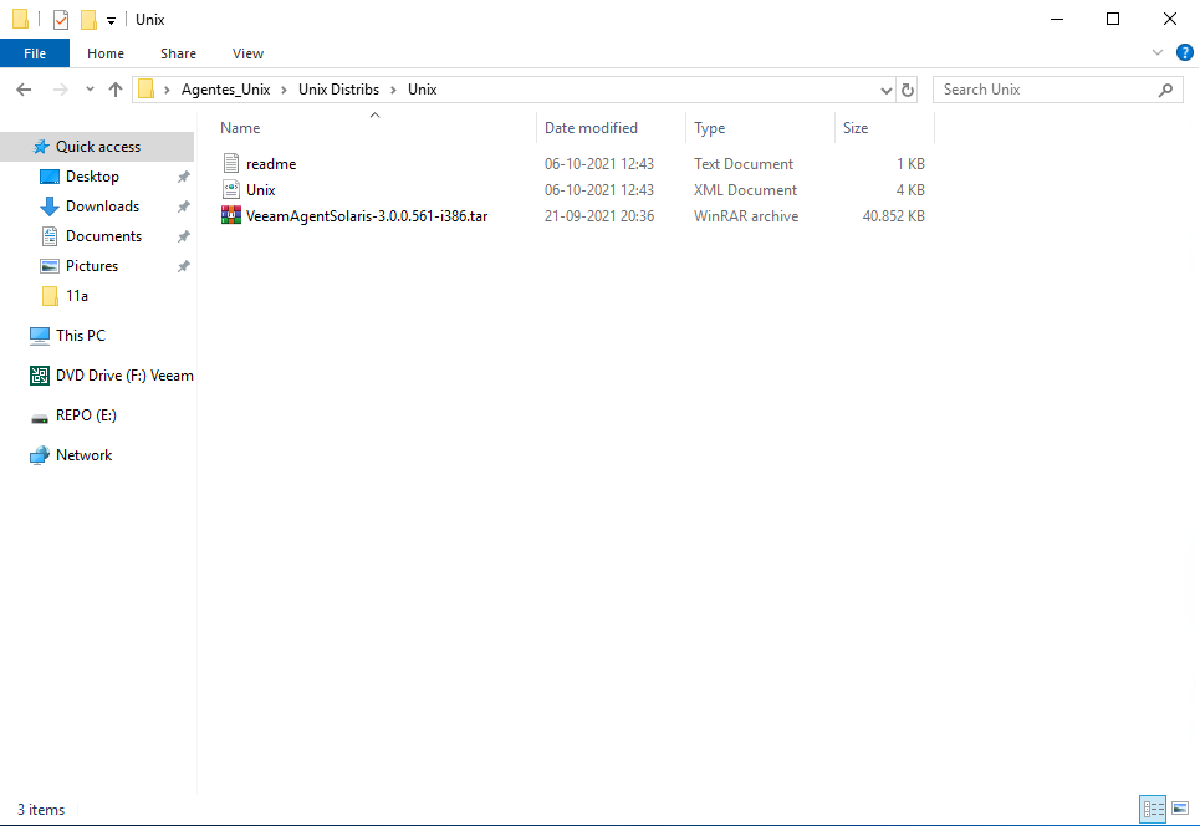
Now that the configuration is complete, we go to the folder we selected (in my case I left it on the server desktop) to inspect the files that were exported

There are 3 files (in my case, only for Solaris - Intel)
- readme.txt
- Unix.xml
- VeeamAgentSolaris
Here, readme.txt walks us step by step through installing Veeam Agent for Solaris. Unix.xml, whose name matches the protection group, holds the VBR connection settings, and last is the Veeam Agent for Solaris installation package. We extract this package and copy mlocate-0.26-i386.pkg and VeeamAgent-3.0.0.561-i386.pkg with your preferred tool (WinSCP in my case) to the Solaris server we want to protect.

Then we follow what readme.txt indicates

Installing and Configuring Veeam Agent for Solaris#
With the files already copied over, we follow the steps in readme.txt and install the packages, starting with mlocate using the command
pkgadd -G -d mlocate-0.26-i386.pkg
Next, we install Veeam Agent for Solaris with the command
pkgadd -G -d VeeamAgent-3.0.0.561-i386.pkg
Now we import the configuration from the xml file we copied to the server, using the following command
veeamconfig mode setVbrSettings --cfg Unix.xmlIt then reports that the agent is registering with the Veeam Backup server

And we can see the agent’s status in the protection group we created earlier

Creating the Backup Policy#
Now, in the Veeam Backup & Replication console, we configure a backup policy to apply to the Veeam Agent for Solaris we just installed. We simply go to “Backup Job” and select “Unix Computer”

Because it’s Unix, in this version of VBR the default option is “Managed by Agent”, so you just click Next and move on to naming the policy

After naming the policy, we select the protection group or the server we’re going to configure

It then shows the selected server (or protection group); click Next

In this step we choose how the server will be backed up. Two options appear:

The two options are:
- Entire Machine - Backs up the entire server, excluding network mount points
- Custom Scope - Backs up the paths specified in the backup policy

Once we’ve decided whether to back up the whole operating system or just certain server paths (in my case I selected the entire server), it asks us to specify the repository for our backups. We select “Veeam backup repository”:

Then we enter the address of our Veeam Backup Server:

We select the repository that will host the backup and the number of restore points

Next we decide whether to use Scripts or File Indexing

And, if needed, we select “enable Application-aware processing” to use scripts, where the setup is straightforward

Then we move on to scheduling when the backup runs

Finally we see a summary of the configuration

And we can watch the policy in action

Finally, as a recommendation for the first run only, we can force the initial synchronization of Veeam Agent for Solaris, as noted in readme.txt, with this command from the Solaris server
veeamconfig mode syncnow
Once the backup runs, we can review the statistics:

And, last of all, the recovery of any file.