
Great news from Veeam! It now supports a new virtualization platform, Red Hat Virtualization, with the goal of protecting virtual machines the easy way while taking advantage of the new CBT APIs implemented in RHV. In this post we will look at how to deploy Veeam for Red Hat Virtualization integrated with Veeam Backup & Replication, reviewing the features and dependencies required for complete RHV protection.
Initial Steps#
As always, the first place to go is the solution’s official documentation, in this case Veeam Backup for RHV 1.0.
- Manual: https://helpcenter.veeam.com/docs/vbrhv/userguide/overview.html?ver=10
- Release Notes: https://www.veeam.com/veeam_backup_for_rhv_1_0_release_notes_rn.pdf
- Download Veeam RHV: https://www.veeam.com/backup-red-hat-virtualization-download.html
One point that is very important to note about this release of Veeam Backup for RHV is that it ships as a public BETA, meaning you can download it and deploy it with official Veeam support. You need valid licensing in your VBR, since it integrates with the Veeam Universal License. You can of course use trial licenses.
Requirements#
To host our backups we need a repository with Veeam Backup & Replication:
- Veeam Backup & Replication 11a (11.0.1.1261) or higher
- Red Hat Virtualization 4.4.8 or higher
Virtual hardware for Veeam RHV:
- 4 CPU cores + 1 per concurrent task (more can be added if needed)
- 4 GB RAM minimum (more can be added if needed)
- 64 GB of space
If you increase the number of CPUs, it is recommended to scale RAM accordingly: for example, if the appliance has 8 CPU cores it should also have 8 GB of RAM, and so on.
Network
- DHCP (we can change the IP address later from the interface)
Ports
Virtual Machine Disks
This setting matters if you want to take advantage of the CBT API on the machines running in Red Hat Virtualization: the disks of the machines you plan to protect must have the " Enable Incremental Backup" option enabled.

Since this is a limitation of the virtualization platform, it is important to review:
Installing Veeam Backup for RHV#
Now that we have downloaded the appliance, we need to copy it to a host in the cluster over SSH. In my case I use WinSCP and I will drop it in the path /tmp/veeam/.

Next, we assign permissions so the RHV host can read the appliance files (remember, I have them in the /tmp/veeam path) with these commands:
chmod -R 755 veeam/
chown 36:36 -R  veeam/
ls -ltrh veeam/
As shown in the image above, the vdsm user and the kvm group now have access to the files, so it is time to import the appliance into the Red Hat Virtualization console. We go to Compute -> Virtual Machines and, in the drop-down menu, select the " Import" option.

Then we select the Datacenter and the Source, which must be " Virtual Appliance", the RHV host where we uploaded the appliance files, and finally enter the path to the files, in this case /tmp/veeam/. Click " Load" and the appliance name will appear so we can select it and move it to " Virtual Machines to Import".

Then click “Next” to review the CPU, Allocation, and other settings. You can leave them at their defaults and click “OK”.

After that, we just have to wait for the appliance import task to finish. You can track it under “Tasks” or directly on the virtual machine:


All that is left now is to power on the machine. We select our machine “veeam_rhv_proxy_beta_vm_1.0.1488” (or whatever name you gave it) and click " Run".

If you want to watch it boot, select the virtual machine and click “Console” to download a utility for viewing the VM:

A " console.vv" file is downloaded automatically. Run it and you will gain access to the virtual machine:

\\ If DHCP does not assign an IP, check with the RHV administrator or restart the appliance**
Configuring Veeam Backup for RHV#
As we saw in the previous image, it shows the IP address assigned by DHCP, so we need to browse to that address over HTTPS:

The username and password for first access are both " veeam", and we log in to Veeam for Red Hat Virtualization.

We select the “Install” option to accept the EULA and enter the requested settings:

After clicking “Next” you enter the new password.

On this screen you can assign the server name, a static IP address, and DNS, for example:

Click Next and we will see the configuration summary. To finish, click “Finish”.

Now wait 60 seconds for the configuration to be applied and for the services to restart internally.

Then we browse in via FQDN or IP to sign in with our new credentials:


Updating Veeam Backup for RHV#
Once in the Dashboard, we click the settings icon (the gear) in the top right.

We select “Appliance Settings”, where we can configure everything the appliance needs. In this case we will set the “Time Zone” and then apply updates.

Next click “Updates” and then “Check and view updates”.

A new tab opens where you can check whether updates are available, both for the operating system and for Veeam Backup for RHV.

Select all the updates and install them.


Close the updates tab and we will move on to configuring Veeam Backup for RHV with the hypervisor and Veeam Backup & Replication.
Configuring Veeam Backup & Replication#
Again we go to the settings icon (the gear) and select “Manage Backup Server”.


Click " Add", enter the Veeam Backup & Replication details, and then click " OK".

It will then show us the applied configuration.

Configuring the Red Hat Virtualization Manager#
Now we click " Manage Virtualization Manager", then " Add", and enter the details. Something very important here is that everything must be configured to use DNS.

The user must always be an administrative account in the form “admin@internal”, and if the certificate is not recognized on the first attempt, simply retry.
Clicking " OK" will ask whether we want to accept the certificate and proceed.

It will then show us the RHV version and the applied configuration.

Now, back in the “Dashboard”, we will see that it recognizes the existing virtual machines and the Veeam Backup & Replication repository configuration:

Creating a Backup Job#
We select the “Jobs” menu within the “Dashboard” to open the Jobs panel. Of course, we do not have any configured yet.

Click “Add” and enter the name of the backup job:

After clicking “Next” we move on to adding the virtual machines to protect.

We click “Add” and select the machines to back up.

After clicking “Add”, we move on to configuring the repository where the backups will be stored. At this step you only have to choose the Veeam Backup & Replication repository and the restore points.

Then we move on to scheduling by clicking “Next” and entering what we need.

Finally, we will see the job configuration summary, and we will start the backup job right after creating it by selecting “Run job when I click Finish”.

And we will see the backup statistics:

And in our Veeam Backup & Replication console we will see the backup job and whether it is running or not:

And, of course, the completion of the backup:

And if you want to verify an incremental backup, run the job again and check the statistics you get:

File or Virtual Machine Recovery#
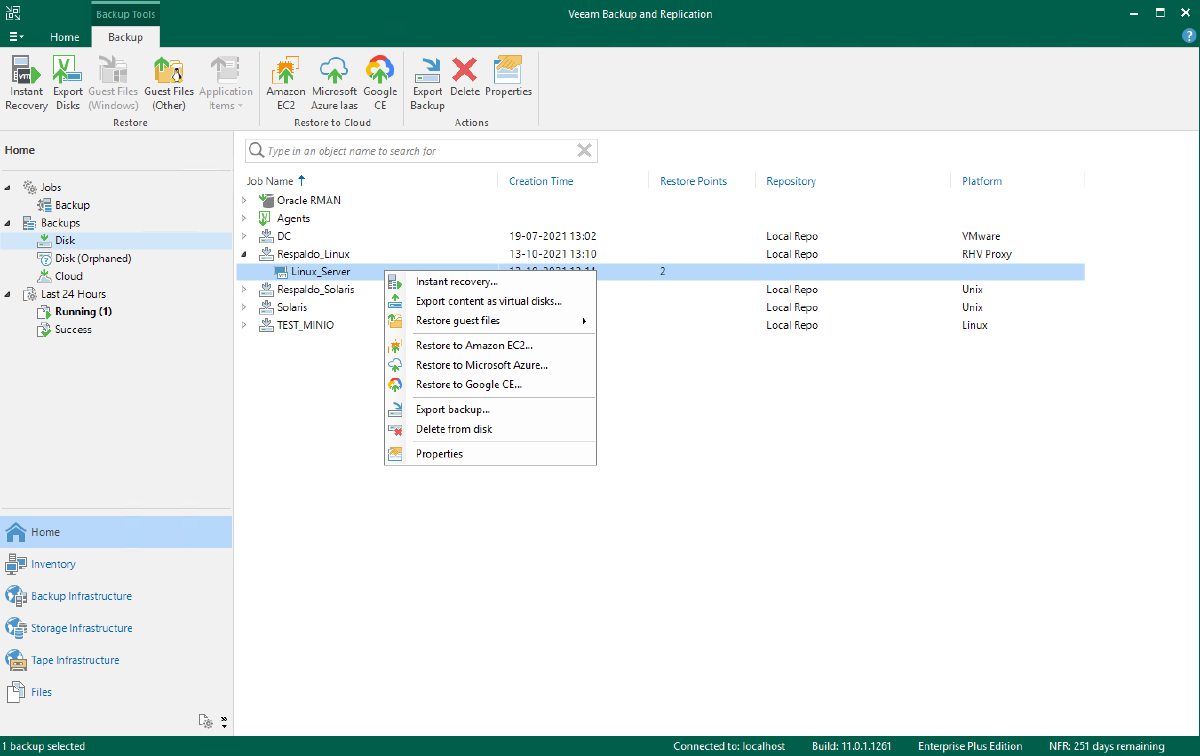
Recoveries can be performed both from Veeam Backup & Replication and from the Veeam Backup for RHV web interface. For example, you can run every recovery from VBR as shown in the following image:

And from Veeam Backup for RHV, by clicking “Protected VMs” and selecting the virtual machine, you can see the restore points along with the two initial options to recover the entire machine or only its disks:

Clicking " Restore" lets you recover the virtual machine to the same location or a different one with different settings. When using " Disk Restore", you can map the disk you want to recover to whichever virtual machine you need to use at that moment. To recover the entire machine, it will show us the following:

Here we can select the restore point using the “Point” icon.

We select the point we want to use and move on to choosing the restore mode. In this case I will use “Restore to Original Location”.

Click “Next” and enter the reason for the restore.

It will warn us that the current virtual machine will be removed from the virtual infrastructure in order to proceed with the recovery:

And we will choose to power on the VM after recovery:

And we will see the recovery statistics:


Recommendations#
It is very important to read the disk limitations, because in order to use native incremental backups from Red Hat Virtualization, the disks must be in QCOW2 format, which enables the use of the CBT API as noted:
Also, in case of any communication issue between the solutions, you can check:
And for cases where incremental backup is disabled system-wide, or you have disks without incremental backup enabled, refer to the “Enable Incremental Backup” option:
Finally, even if you do not enable the option above, you can still protect your virtual machines with Veeam Backup for Red Hat Virtualization.