
One of the frequent questions I’m always receiving is how to perform database recovery with Veeam Explorer for Oracle, which has different ways to accomplish this when using Veeam Oracle Plugin, commonly used in RAC installations as well as in installations where the Oracle database is standalone. In particular, this post is only for performing the Veeam Plugin installation from the Veeam Backup & Replication console, and we’ll also review the recovery options when performing backups through the RMAN Plugin.
Introduction#
There’s always the question of how to easily backup and recover Oracle with Veeam, or how RMAN backups work with Veeam. Just by reading the Veeam help center documentation, you can understand everything, but traditionally, who reads the manuals completely? :)
Oracle Recovery Manager / RMAN#
We should always take into account both Oracle RMAN and Veeam documentation when performing these types of backups and recovery, especially to clearly understand how it works if you don’t have in-depth knowledge of the solutions:
- RMAN: https://docs.oracle.com/en/database/oracle/oracle-database/23/bradv/introduction-backup-recovery.html
- Veeam Plugins for Oracle RMAN: https://helpcenter.veeam.com/docs/backup/plugins/rman_plugin.html?ver=120
- Veeam Explorer for Oracle: https://helpcenter.veeam.com/docs/backup/explorers/rman_backups.html?ver=120
Let’s remember that several versions ago, Veeam supports centralized management of database plugin installation, Managed Mode, and the traditional version Unmanaged Mode. The main difference is that in the first mode, it will be completely managed by the Veeam Backup Server, while in the second mode, the plugin will send backups to the configured Veeam Backup repositories, but won’t have any management from Veeam Backup Server, except for recoveries.
Oracle Plugin Installation from Veeam Backup#
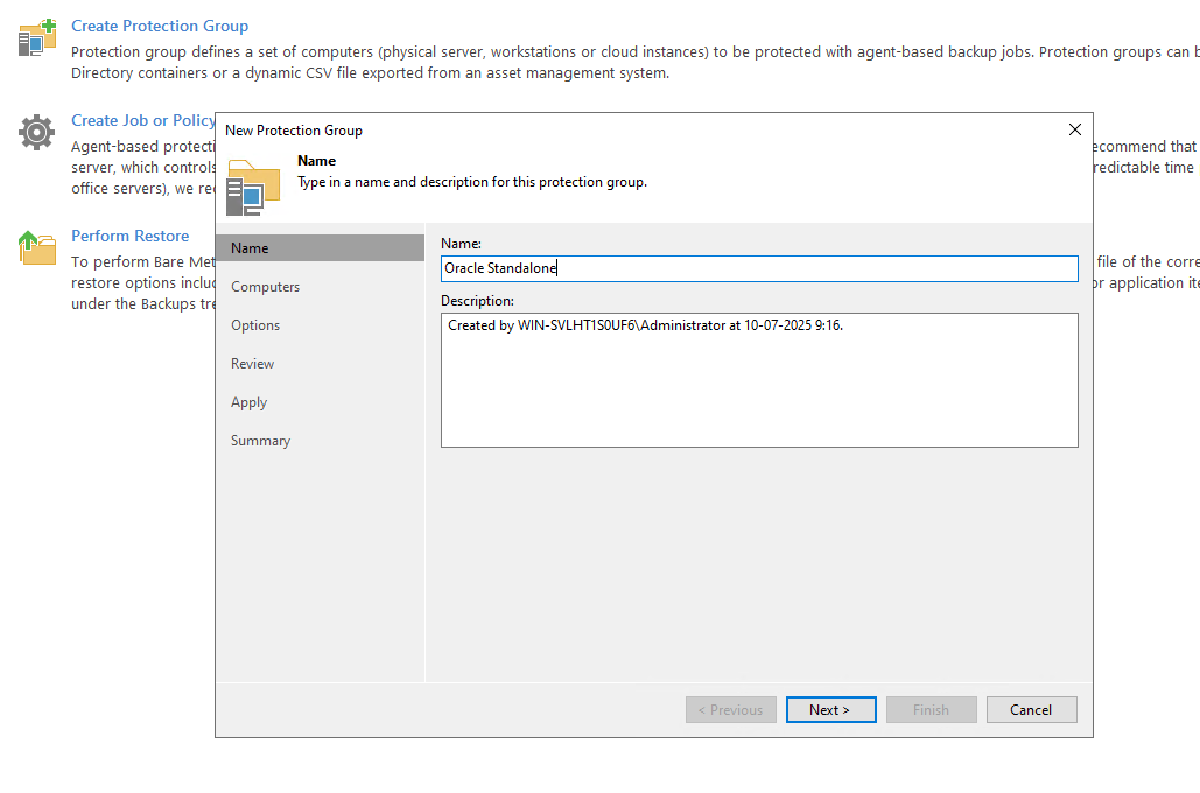
Installation on Oracle Standalone or RAC servers is simple, as you just need to create a “Protection Group” within Veeam Backup, add the servers where we want to install the plugin, then configure what type of plugin and whether it should be kept updated, just like it’s currently done with Veeam agents for Windows, Linux, etc.


In case you’re not using root, you can use an account with sudo permissions, as administrative privileges are necessary to install our plugin.

At this stage it’s important, as shown in the previous image, we need to decide whether to install the backup agent, install the plugin, or both. For this case, we’ll only select “Install application plug-ins to be installed” and then click on “Configure…” to select the plugin to install.

Then click next to see that everything is configured correctly:

And finally click on Finish to see the installation status of both nodes


The installation is now complete. In the previous image, you can see the result, and in the server list, it shows that the plugin is installed on each machine.
Oracle RMAN Backup Policy Configuration#
Now it’s as simple as creating the new backup policy to protect existing databases. In this case, we’ll back up the “AUSTIN” database to later test the recovery options:


After selecting the Storage or repository where we’ll store our backups, we need to specify the credential to use for a correct and consistent backup. Select either operating system or database credentials - in this case, we’ll use the “oracle” user.

In the previous image, define what to do with the archive logs, how many channels will be used for the archive logs, and in case Pluggable Databases exist, the selection or exclusion of those databases. Finally, the Schedule and Finish the Wizard. Then Veeam Backup will show when it will execute:

In this case, we’ll force a database backup to run tests and we’ll see the successful execution of the backup:

Recovery to Another Oracle Instance - Original Instance#
For recovery, there are multiple ways, but for this example, we’ll use 4 recovery methods:
- Recover the database to the same original instance
- Recover the database to the same original instance but with a different database name
- Recover the database to another instance with the original name and DBID
- Recover the database to another instance but with a different database name
Starting with the first one, we just need to access Veeam Backup & Replication, go to “Backup ->Disk”, select the Oracle RMAN backup and click on “Restore from Oracle RMAN…”

It will open Veeam Explorer for Oracle and show us the protected databases, in this case, AUSTIN. We select the database and click on “Restore”:

We select the instance where to recover, in this case, the original one from where we obtained the backup, and we log in with the “oracle” user:


Since we’re going to recover to the same instance, the requirement is always to have " At least an empty database with the same name and DBID must exist on the specified server" - the previous text is very important when you need to preserve the same database name. Then next and we’ll select the restore point that’s needed, in this case use the last available restore point.

Then we select where the files are located:

And finally, how many RMAN channels we’ll use for recovery. Remember that there’s a post on this blog where it explains in detail how RMAN channels work.

And then just wait for the recovery:


Recover the DB to the Same Original Instance | Different DB Name#
We follow the same previous steps, but what changes here is the name of the instance we’re going to recover. In this case, we’ll use “TEXAS”, so when we reach the following screen, it’s possible to change the name:

Then select which restore point to use for recovery, and indicate to generate a new DBID:

And finally, specify or review the paths where the folders will be generated for the recovery with the new name:

Then restore and view the restoration status:


Recover the DB to Another Instance with the Original Name and DBID#
For this option, you need to review the Oracle RMAN documentation to correctly understand how to recover the database with the same name and DBID from the backup. In fact, the following link indicates the procedure with RMAN to recover to another server or host:
In summary, what the Oracle RMAN documentation indicates is that to restore the database with the same name, it’s always necessary to preserve the database DBID, use the backed-up control file with the AUTOBACKUP configuration that Veeam performs, and of course the SPFILE. Therefore, to make the destination server preparation easier and more accessible, I have the following script to execute on the server where you want to recover with Veeam Explorer for Oracle RMAN.
https://github.com/mescobarcl/veor-restore
When visiting the script link on GitHub, it has a readme with details of what the script does and the necessary requirements. The idea of the script is to make it possible to perform these types of recoveries easily without the need to be a DBA in case the company doesn’t have a DBA or the DBA isn’t available. Therefore, the requirements are:
- Run as oracle user
- Have the Oracle instance operational
- The Veeam Plugin for Oracle installed and configured from the Veeam console (Initial step)
Then we begin by downloading the script and giving it execution permissions:

We execute it and enter the data that the script requests:

After entering " y", it will create the necessary folders, files, and password files, and then ask if we need to configure the Veeam plugin:

The configuration will request the authentication method, which can be by user or recovery token. In this case, we’ll use the second option and generate it from the Veeam Console:


Copy the recovery token (valid for 24 hours) and paste it where the script requests it, and then it will ask us if we need to recover the Control File:

Then it will ask us if we know the Veeam Backup ID or not. If we do it by default, the script will help us obtain the Backup ID

Now it will ask us for the control file backup name. To obtain it is simple, there are two options: if you select “n” the script will search within the backup for the control file AUTOBACKUP. To avoid the search, it’s easier to go to the original instance and execute the following:

Look for the backup name that begins with c-

Finally, when you copy the control file backup name, you paste it into the script and the complete preparation will begin:


And the instance is completely prepared to recover from Veeam Explorer with the same name and DBID. We validate that the instance is not running and go to Veeam Backup Server to perform the recovery with the Explorer:

The only difference we’ll make here is to change the server where we’ll recover:

The original server was oraclem1 and we’re going to recover the original database to server oraclem2 and we’ll see the successful recovery


Recover the DB to Another Instance with Different Name and DBID#
Just like in the section “Recover the DB to the Same Original Instance | Different DB Name”, you just need to follow the same steps but only change the destination server and the database name that you want to recover in the destination instance, and it will simply work.