Data protection, Kubernetes, cybersecurity and AI. Hands-on guides from the trenches: Veeam, Kasten, VMware, Oracle, cloud, and whatever I’m breaking in the homelab this week.
Table of ContentsTable of Contents
Great news! The acquisition of Kasten by Veeam Software, which extends the benefits of data protection of Veeam in modern data centers with container technologies using Kubernetes or k8s. In this post we will see the installation, configuration and recovery of containers with Kasten in a cluster of Kubernetes based on tanzu Kubernetes grid.
Now more than one will wonder, what is Kasten?, Okay, Kasten is the backup and disaster recovery leader for Kubernetes, one of the important features is that it is a very easy to use solution, it is developed for kubernetes and in a cloud-native architecture.
It is because of that Kasten can help protect your containers with application integration either in Public or Private Clouds, for example, Google Kubernetes Engine, AWS Elastic Kubernetes Services, Azure Kubernetes Services, IBM Kubernetes Services, VMware vSphere, Red Hat OpenShift, among others.
As well as integrate with different Storage technologies, such as:
It also allows container migrations between different container services in case of a disaster, change of provider, testing or simply maintaining a hybrid architecture.
If you want to know more about Kasten, you can enter their website and the documentation website:
After knowing a little what it is Kasten, we will start by detailing what I have as an environment to support my containers Subsidiary Kubernetes Grid 1.1.3, a vSphere 7 Update 1, remember that it can be used from vSphere 6.7 Update 3
Where the management cluster is with a production plan, and for the application cluster I also use the production plan to use multiple k8s roles, if you want to know more about the plans offered by Tanzu Kubernetes Grid or TKG visit:
And if we review the cluster resources we can see:
With the command:
kubectl get pvc,pv,sc --all-namespaces
```bash
It will indicate the requests for pvc (PersistentVolumeClaim) disks for applications, persistent volumes that are provided by the system or dynamic pv (PersistentVolume), and the storage class offered to the cluster sc (Storage Classes).
```bash
kubectl get pod --all-namespaces
```bash
It will indicate all the pods that Tanzu installs by default when creating a cluster and their respective namespaces, which allows us to identify the project that is installed in the cluster.
```bash
kubectl get node --all-namespaces
```text
And finally see the number of nodes that are involved in the cluster and their respective role, as can be seen in the previous image it is possible to see:
```text
kube-system vsphere-csi-controller-8c9b98f7f-tt9p6 5/5 Running 8 3h30m
kube-system vsphere-csi-node-5k2fp 3/3 Running 0 3h17m
kube-system vsphere-csi-node-5skv2 3/3 Running 3 3h11m
kube-system vsphere-csi-node-g9dpn 3/3 Running 0 3h17m
kube-system vsphere-csi-node-rptch 3/3 Running 3 3h30m
kube-system vsphere-csi-node-vgn7s 3/3 Running 3 3h17m
kube-system vsphere-csi-node-xg6mb 3/3 Running 3 3h17m
```bash
This indicates that the vSphere CSI driver is already installed, CSI is the acronym for Container Storage Interface:
https://github.com/kubernetes-sigs/vsphere-csi-driver
This driver is the essential piece for the integration of Kubernetes with vSphere as it allows you to create disks to assign them to the persistent volumes needed for the applications installed in the Tanzu cluster Kubernetes grid.
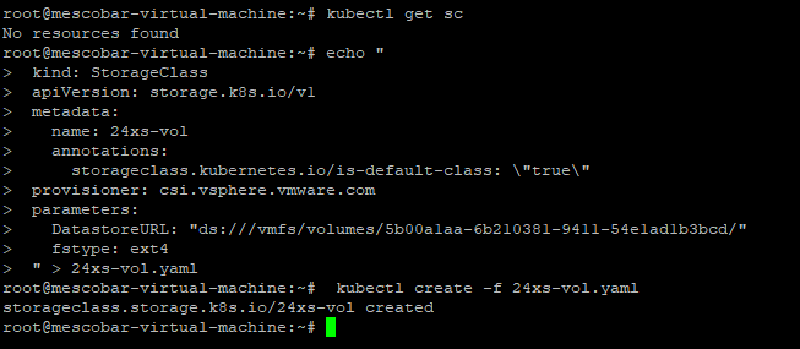
## storage classNow one of the requirements of Kasten they are persistent disks and as we saw before, the cluster by default does not have any Storage Class enabled, therefore, the application that we install will not be able to create the volumes that it needs for its operation, for this we must execute on the machine that is administering TKG:
```bash
echo"
kind: StorageClass
apiVersion: storage.k8s.io/v1
metadata:
name: 24xs-vol
annotations:
storageclass.kubernetes.io/is-default-class: \"true\"
provisioner: csi.vsphere.vmware.com
parameters:
DatastoreURL: "ds:///vmfs/volumes/5b00a1aa-6b210381-9411-54e1ad1b3bcd/"
fstype: ext4
" > 24xs-vol.yaml
kubectl create -f 24xs-vol.yaml
```bash
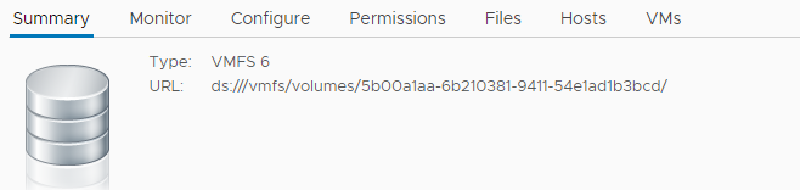
where on the line **5** we can assign the name of the Storage Class, in the line **7** make sure the value is **true**” since with this we make sure that it is configured and enabled by default, line **8** we make sure that it is the vsphere csi driver, on the line **10** It is key to indicate the url of the Datastore that we will use as the destination of the persistent volumes in vSphere (in the following image you will see where to take the data from) and finally the name of the file to save it with its .yaml extension.
As we can see in the previous image, the first command shows us that we do not have any Storage Class in our Tanzu cluster and then we execute the file to generate the Storage Class that we can see with the command:
```bash
kubectl get sc
```bash
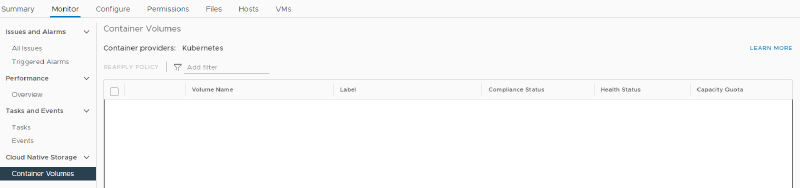
Now, if we check the monitoring of the DataStore that we selected to be the storage of our persistent volumes, we will see the following in vCenter:
So now we have everything ready to install. Kasten k10 in its latest version 2.5.22.
## Installation of KastenWe will now review the prerequisites of Kasten that you can find them:
https://docs.kasten.io/latest/install/requirements.html
The first thing you need is to install helm, which is a package manager for easily installing applications:
https://helm.sh
The installation of helm is very simple, we just have to download the file from github and move it to the executable folder of the server that you are using to administer Tanzu Kubernetes Grid or TKG:
```bash
wget https://get.helm.sh/helm-v3.3.4-linux-amd64.tar.gz
```json
```bash
tar xvzf helm-v3.3.4-linux-amd64.tar.gz
```json
```text
cd linux-amd64/
```bash
And finally we move it to the executable folder:
```bash
mv helm /usr/local/bin/
```bash
if we execute the command helm version we will see the version of helm:
As indicated in the manual Kasten, what we must do now is add the repository of Kasten in helm, with the following command:
```bash
helm repo add kasten https://charts.kasten.io/
```bash
And then create the project name or namespace with the command:
```bash
kubectl create namespace kasten-io
```bash
Then we will proceed to the installation as indicated in:
https://docs.kasten.io/latest/install/vmware/vsphere.html
The first command to run is:
```bash
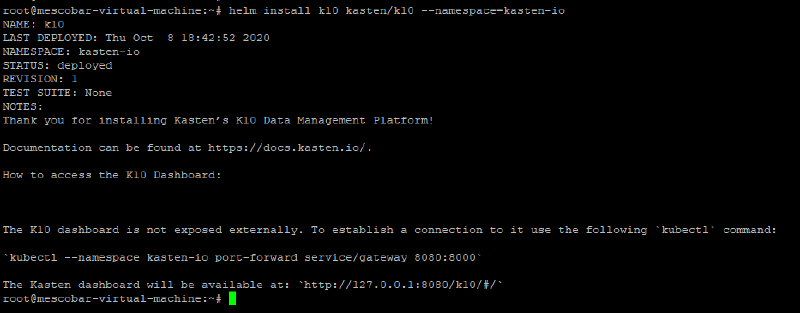
helm install k10 kasten/k10 --namespace=kasten-io
```bash
Which will show us:
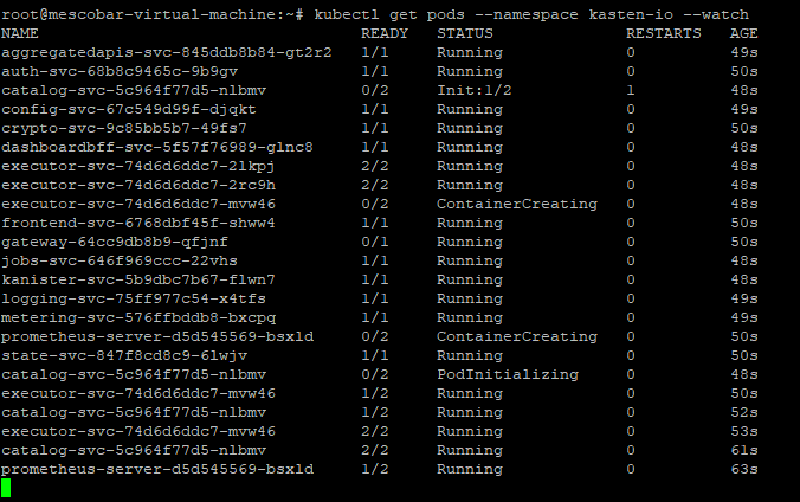
And then with the following command we can see the installation progress:
```bash
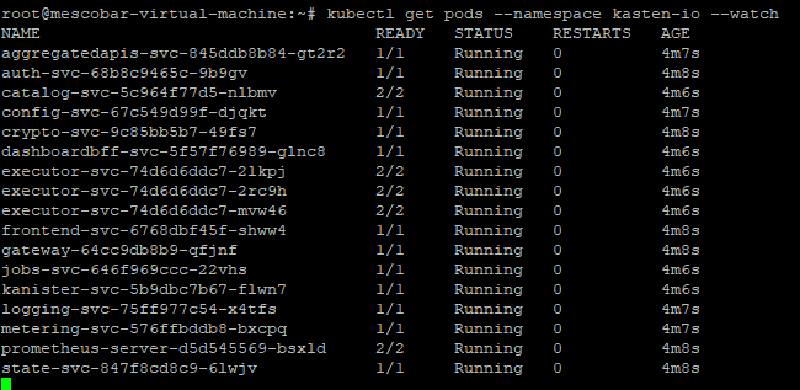
kubectl get pods --namespace kasten-io --watch
```bash
And we can see:
We must ensure that all pods are in the “ **Running**” since with this we can then access the console of Kasten.
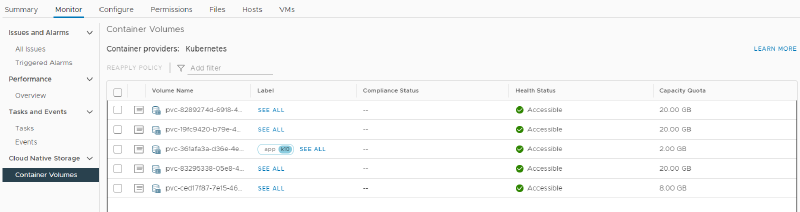
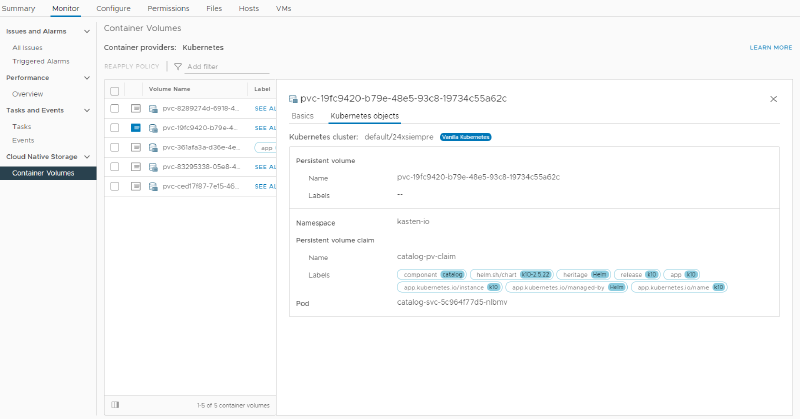
If we review our Datastore that previously did not store persistent volumes and update we can see:
It will list the volumes used by Kasten for its correct operation. And we make sure again that all the pods are in their “Running” state:
And we already have installed Kasten!
## Access to KastenAs we saw in a previous image, Kasten It indicated that to access the Dashboard we need to enter a command:
```bash
kubectl --namespace kasten-io port-forward service/gateway 8080:8000
```text
And then enter the url:
```text
http://127.0.0.1:8080/k10/#/.
```bash
And obviously if you have GUI or Desktop installed in your Tanzu administration linux Kubernetes Grid you will be able to access. But what happens if I don't have GUI installed and I need to access it from the network via Web?
There are different ways to access the Dashboard of Kasten, here we will see the simplest and fastest with Authentikation that you can even find in the manual of Kasten, in fact we will review the following links:
https://docs.kasten.io/latest/access/dashboard.html#dashboard
https://docs.kasten.io/latest/access/Authentikation.html#basic-auth
```bash
https://hostingcanada.org/htpasswd-generator/
```bash
The first link tells us the multiple ways to enter the Dashboard, in this case we will use “ **Accessing via LoadBalancer**“, for this we will install “metallb” which is a balancer for k8s:
https://metallb.universe.tf
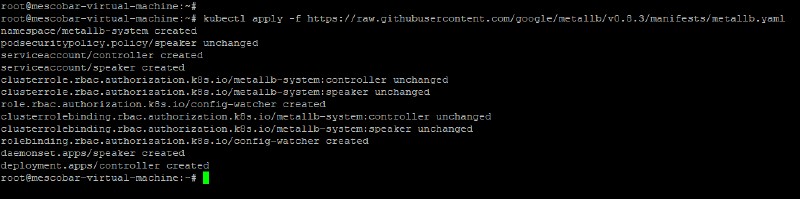
The installation is very simple, we must execute the following command:
```bash
kubectl apply -f https://raw.githubusercontent.com/google/metallb/v0.8.3/manifests/metallb.yaml
```bash
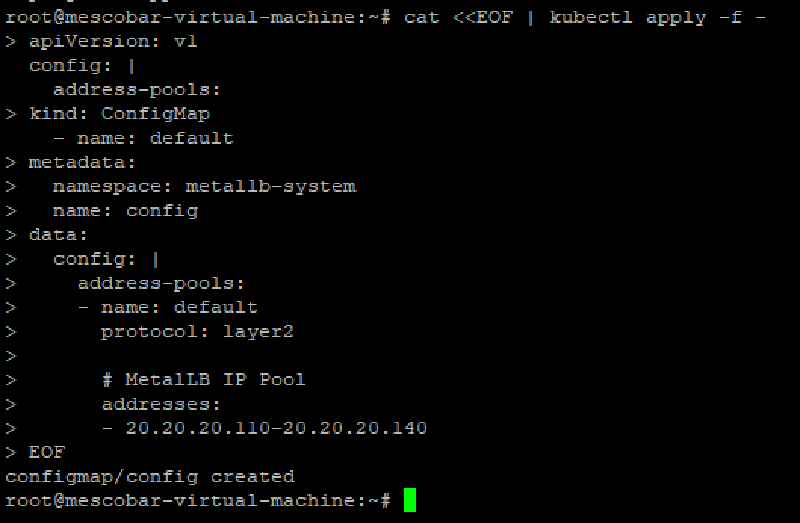
And it's already installed. Now we'll configure it with the IP address range we want it to work with:
```bash
cat <<EOF | kubectl apply -f -
apiVersion: v1
kind: ConfigMap
metadata:
namespace: metallb-system
name: config
data:
config: |
address-pools:
- name: default
protocol: layer2
# MetalLB IP Pool
addresses:
- 20.20.20.110-20.20.20.140
EOF
```bash
On the line **15**, we must enter a pool of IP addresses to be assigned to the services we install. And we execute:
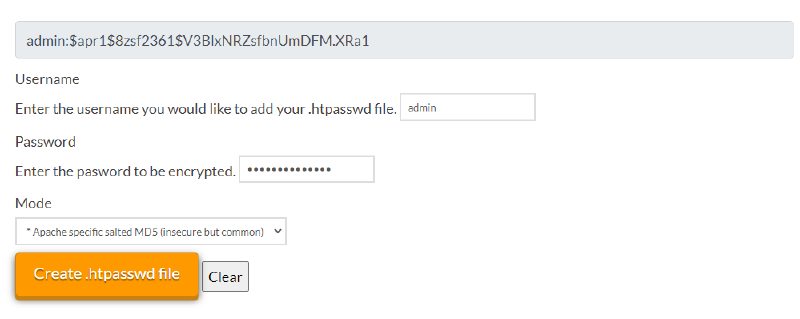
After this we return to the configuration of Kasten, we must generate a password htpasswd, in the previous links there is a website that allows us to do it online:
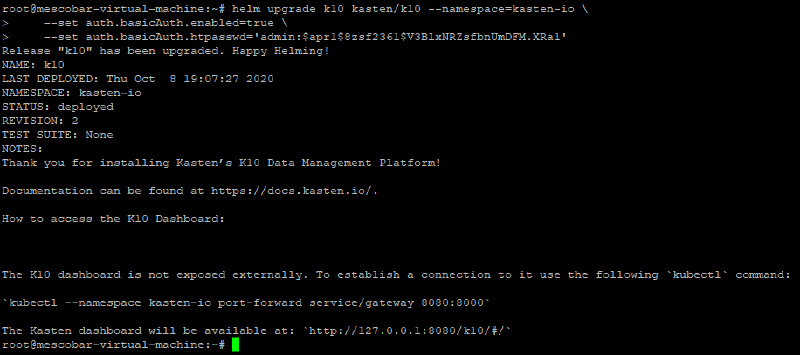
We copy the username and password and add it in the following command (If you copy and paste the encrypted password is 24xsiempre.com):
```bash
helm upgrade k10 kasten/k10 --namespace=kasten-io \
--set auth.basicAuth.enabled=true \
--set auth.basicAuth.htpasswd='admin:$apr1$8zsf2361$V3BlxNRZsfbnUmDFM.XRa1'
```bash
On the line **3**, you must copy your username and password generated on the web. Then we run:
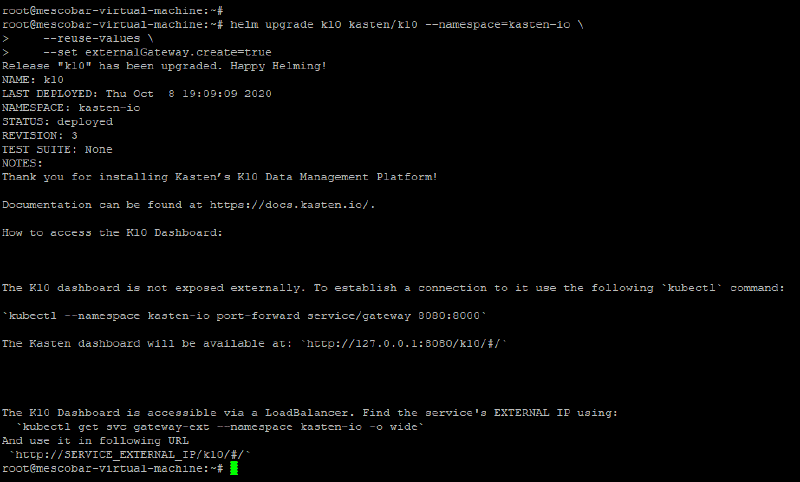
With the previous command we only configure the Authentikation mechanism, now with the following instruction we will indicate that it allows us to access through the gateway of Kasten and the balancer:
```bash
helm upgrade k10 kasten/k10 --namespace=kasten-io \
--reuse-values \
--set externalGateway.create=true
```bash
We saw that the message changed and Kasten Now it indicates that we must access the Dashboard via:
```bash
The K10 Dashboard is accessible via a LoadBalancer. Find the service's EXTERNAL IP using:
`kubectl get svc gateway-ext --namespace kasten-io -o wide`And use it in following URL
`http://SERVICE_EXTERNAL_IP/k10/#/````bash
Therefore, we only have to know the IP address to access, which we will obtain with the following command:
```bash
kubectl get svc gateway-ext --namespace kasten-io -o wide
**It should be noted that I have DHCP enabled in TKG**
In my case the access url will be http://kastentkg.24xsiempre.cl/k10/#/ since the IP address associates it with the DNS (If you do not directly access the IP of EXTERNAL-IP) and will request the previously configured username and password through the page that generates the htpasswd:
And we will see the Welcome screen of Kasten, we enter company, mail and accept:
we already have it working Kasten, with the possibility of remote access with username and password, now we only need to enable and configure the solution, an important message appears at the bottom of the Dashboard “ K10 Disaster Recovery is not enabled for this cluster. “
We click on " see settings" where it will indicate that we must make some configurations before enabling Kasten:
We click on " Room rental” and we will create a new profile, in this case Amazon s3:
As can be seen, you can use different profiles to store the Containers, which can be:
Google Cloud Storage
Amazon S3
AzureStorage
S3 Supported
Enter the requested data and we will see the created profile:
Then click on “ Infrastructure” and we will generate a profile for vSphere:
Like the previous profile, we have different options:
OpenStack
front
portworx
vSphere
Now we click on “ K10 Disaster Recovery” and we will proceed to enable Kasten by clicking on " Enable K10 DR“, we select the profile of “ Location” and assign a password to encrypt the backups. Very important Save the password as you will need it for some recoveries
And then if you want, you change the Dashboard theme in the “Dashboard” menu and we return to the beginning to configure Backup Policies:
At the same time I installed a wordpress in its own namespace to see the backups of an additional application:
When creating a new namespace, Kasten will automatically recognize it in the “ Applications” and will indicate that it is “ unmanaged” since it has no associated backup policy:
You can throw a Snapshot” directly from “ Applications“, perform restore tasks or “ Export” the Container you want.
We will enter " Policies” and we will see a default policy of Kasten to protect yourself:
Which, as a recommendation, we should not change since it will be running with its respective retention policy.
Now we will click on “ Create New Policy” and we will enter the requested data:
Where we enter the name, comments and action, for the case of data protection we need to select “ Snapshot” and select the frequency of the snapshots and their respective retention. If you click on “ Show Advanced Frequency Options” you can select the execution time:
Then if we wish, we can export the backups to the S3 bucket by enabling “ Backups via Snapshot Exports"
Then we will select the application to back up, searching for it by “ Name” or if you want by “ Label” in this case I will select wordpress
And finally we click on “ Create Policy"
Now we can run the backup directly or wait for the schedule. I will run it to view the backup by clicking “ run eleven"
And we will return to the Dashboard to see the status of the backup:
We will also see snapshot executions in vCenter:
We will also see all the executions that we configured in the policy:
And we are already endorsing our Tanzu Kubernetes grid with Kasten!
If we click on “ Applications” we will see our successful backup policy for wordpress:
At the bottom of the policy you will see a button “ Restore” will show us the restore points we have:
And if we click on the restore point:
It will allow us to choose where you want to recover from, either from s3 or from the local snapshot, in this case I will select the local one:
To confirm:
And finally we return to the Dashboard to see the status:
And we can see the successful recovery:
There are multiple recovery options that must be analyzed according to the need, but as we saw the backup is simple, the detection of namespaces does it automatically and it is very easy to configure backup policies, in the following link you have the details of all the recovery options: