
In this post we’ll take a detailed look at vScan 2.0, an open-source desktop application I developed to scan Veeam Backup & Replication v13+ restore points for security vulnerabilities. We’ll go over the architecture, installation, configuration, scanning capabilities, vulnerability management, reports, security and much more.
Why Scan Your Backups?#
First things first, we should always ask ourselves: why do we need to scan our backups? The answer is simple: if a server was compromised weeks ago and we discover it today, all the restore points from that period contain the vulnerabilities or malware. If we need to restore and don’t know which restore point is safe, we’re restoring blind.
With vScan we can scan any restore point before restoring it, know exactly which vulnerabilities it contains and make an informed decision.
Also, keep in mind that Veeam already includes entropy analysis, malware detection, among others in the solution. So vScan comes in as an additional complement so that when needed, you can verify with the latest vulnerability publications whether your machine or backup that you’re about to recover has vulnerabilities or not, and perform the recovery in an isolated environment to apply vulnerability mitigation before deploying to production.
What is vScan?#
vScan is a desktop application for Windows and macOS that integrates with Veeam Backup & Replication v13+ through its REST API. The application mounts virtual disks from any restore point on a remote Linux server via SSH and runs vulnerability scanners against the mounted filesystem.
It’s not just a scanner — vScan provides complete vulnerability lifecycle management: tracking, states, automatic fix detection, integration with CISA’s KEV catalog, executive and technical PDF reports, email and desktop notifications, batch scanning, scheduled scans and much more.
The application is available on GitHub: https://github.com/mescobarcl/vScan
Supported Platforms#
| macOS | Windows | |
|---|---|---|
| Minimum version | 13.0 (Ventura) | 10 (1803+) |
| Tested | Ventura 13, Sonoma 14, Sequoia 15, Tahoe 26 | Windows 10, 11, Server 2019/2022/2025 |
| Architecture | Apple Silicon (arm64) | x86_64 |
| Installer | .dmg | .exe |
| Biometrics | Touch ID, Face ID | Windows Hello |
| Credentials | macOS Keychain | Windows Credential Manager |
A remote Linux server with SSH is required to mount the disks and run the vulnerability scanners.
Requirements#
To use vScan we’ll need:
| Component | Requirement |
|---|---|
| Operating System | Windows 10+ or macOS 13+ |
| Veeam VBR | Veeam Backup & Replication v13 or higher |
| Linux Server | Rocky Linux 9+ |
| Scanners | Trivy, Grype and Jadi |
Installation#
Installation is very straightforward — we download the installer from the releases page on GitHub:
https://github.com/mescobarcl/vScan/releases
For macOS we download the .dmg file and drag the application to the Applications folder. For Windows we download the .exe and run the installer.
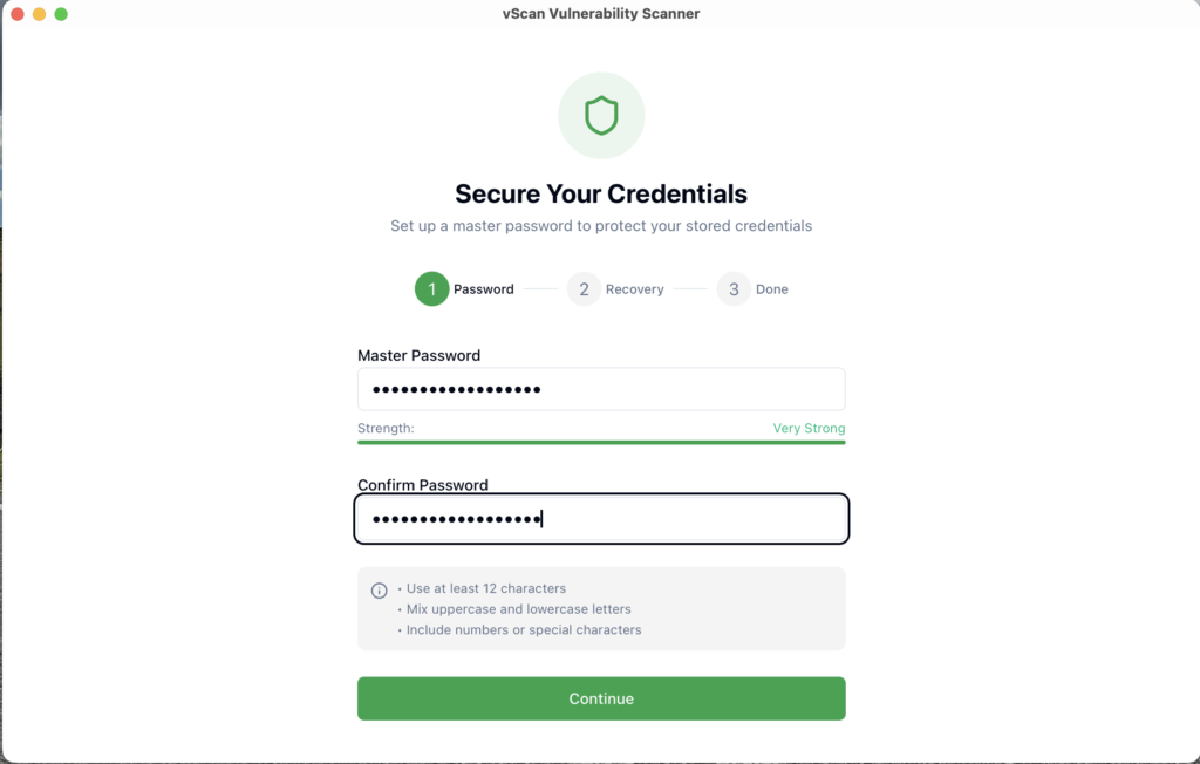
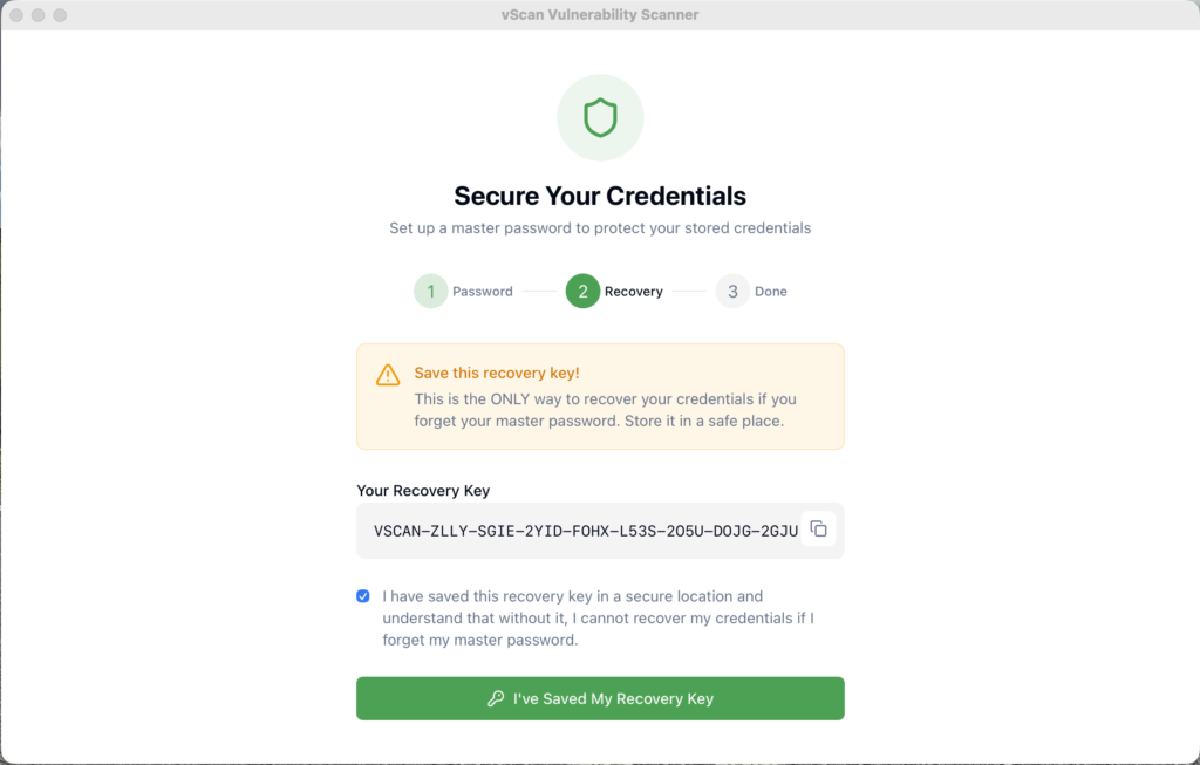
Initial Configuration – Master Password#
When launching vScan for the first time it will ask us to create a Master Password. This password protects all credentials stored in the application using AES-256-GCM encryption with Argon2id key derivation.

It’s very important to save the Recovery Key that’s generated automatically. This key in VSCAN-XXXX-XXXX-XXXX-XXXX-XXXX-XXXX-XXXX-XXXX format is the only way to recover access if the Master Password is forgotten.

Once the Master Password is configured, vScan supports biometric unlock with Touch ID on macOS and Windows Hello on Windows for quick access.
VBR Server Connection#
The first step after creating the Master Password is connecting to our Veeam Backup & Replication server. We go to the configuration section and we’ll see a 5-step wizard that will guide us:
In Step 1 we configure the VBR connection:
- Enter the hostname or IP of the VBR server
- Port (default 9419 for REST API)
- Username in domain\user format
- Password

vScan connects to the Veeam REST API and automatically retrieves the server information: VBR version, license edition, SQL database version, etc.

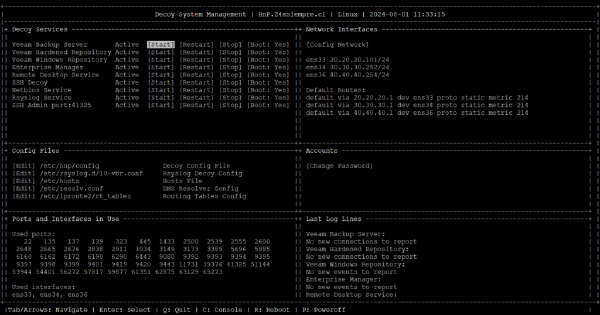
Linux Server Connection#
In Step 2 we configure the Linux server that will act as the scanner host. Here we have two options:
- Import from VBR: If we have Linux servers registered as managed servers in VBR, we can import them directly
- Manual configuration: We enter the IP, SSH port, user and password or private key

When connecting, vScan runs an automatic 8-step setup process:
- Validate credentials
- Establish SSH connection
- Accept Fingerprint
- Detect Rocky operating system
- Verify and install system packages
- Configure Trivy scanner
- Configure Grype scanner
- Configure Jadi scanner
- Save configuration

vScan automatically detects if the scanners are installed, what their current version is, and offers to install or update them. Downloads are verified with SHA-256 before installation to prevent tampering.
It also performs SSH host key verification using TOFU: the first time we connect to a server, the fingerprint is stored. If the fingerprint changes on future connections, vScan alerts us of a possible Man-in-the-Middle attack.
Notifications – Email and Desktop#
vScan supports two notification channels:
- Native operating system notifications for real-time events
- SMTP configuration with STARTTLS/SSL for email alerts
The 6 configurable event types are:
| Event | Description |
|---|---|
| Scan Completed | When a scan finishes successfully |
| Scan Failed | When a scan fails |
| Batch Completed | When a batch scan finishes |
| Schedule Started | When a scheduled scan starts |
| KEV Found | When an actively exploited vulnerability is detected |
| Critical Vulnerabilities | When critical severity vulnerabilities are found |


Dashboard#
Once the connections are configured, vScan’s main view is the Dashboard which shows us a complete summary of the security posture:

The dashboard includes:
- Vulnerability counters by severity: Critical, High, Medium, Low
- KEV counter: vulnerabilities that are in CISA’s Known Exploited Vulnerabilities catalog
- Severity distribution chart
- Vulnerability trend over time
- Top most vulnerable VMs with ranking by severity
- Recent scans with real-time status
- Scan statistics: total, last 7 days, last 30 days
Data updates in real time as new scans complete.
Three Scanning Engines: Trivy, Grype and Jadi#
vScan supports three vulnerability scanning engines:
Trivy#
Scanner by Aqua Security, one of the most widely used in the industry. Excellent for Linux distribution packages and containers. vScan installs and manages it automatically. Official documentation: https://github.com/aquasecurity/trivy
Grype#
Scanner by Anchore, another popular option for vulnerability scanning. Complements Trivy nicely with a different approach. Official documentation: https://github.com/anchore/grype
Jadi#
My own CLI scanner written in Rust, specifically designed to cover the gap that Trivy and Grype leave in detecting vulnerabilities in Windows binary software and KB patches. Jadi uses multiple vulnerability sources:
- NVD (National Vulnerability Database) for CPE matching
- MSRC (Microsoft Security Response Center) for Windows vulnerabilities and KBs
- OSV (Open Source Vulnerabilities) for language ecosystems
- GHSA (GitHub Security Advisories)
- CISA KEV (Known Exploited Vulnerabilities)
Each scanner can be installed, updated and uninstalled directly from vScan’s UI. Installations are verified with SHA-256 to ensure binary integrity.
https://github.com/mescobarcl/jadi
How to Scan Backups#
To scan a VM, vScan provides a guided 5-step wizard:
Step 1: Select VMs#
We select the VM we want to scan. vScan retrieves the VM list directly from the VBR API.

Step 2: Select Restore Point#
We choose the restore point we want to scan. The date, type and size of each available restore point are displayed.
Step 3: Select Disks#
We select which disks of the VM we want to mount and scan. We can select all of them or just specific ones.
Step 4: Mount Disks#
vScan publishes the restore point through Veeam’s Data Integration API and mounts the disks on the Linux server using FUSE or iSCSI. Mount progress is shown in real time.

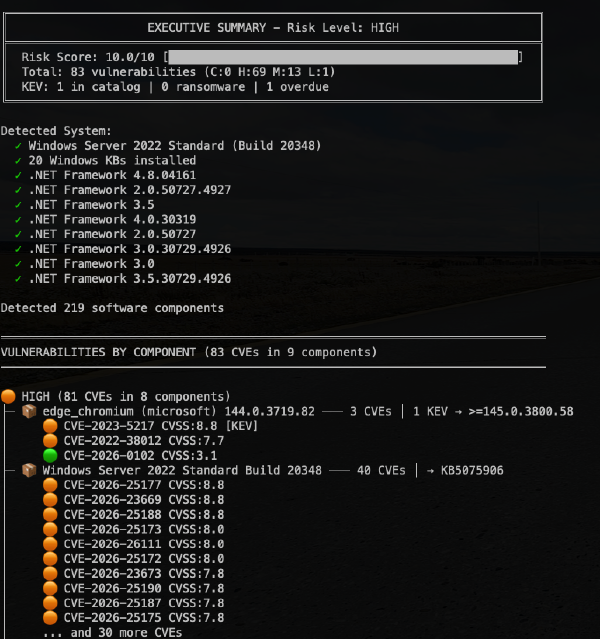
Step 5: Scan and Results#
Once the disks are mounted, the selected scanner runs against the filesystem. Progress is shown in real time with estimated ETA.
When finished we see the results with the total vulnerabilities found by severity.

Vulnerability Lifecycle Management#
This is one of the most important features of vScan 2.0. It’s not just a scanner, it’s a vulnerability lifecycle management platform.
Vulnerability Browser#
The browser allows filtering and searching vulnerabilities with multiple criteria:
- Severity: Critical, High, Medium, Low, Negligible
- Status: Open, Fixed, Won’t Fix, Accepted, False Positive
- VM Name: filter by specific server
- Package Name: search by affected package
- Scanner Type: filter by Trivy, Grype or Jadi
- Date range: first detection or last detection
- KEV: only vulnerabilities in the CISA catalog

Lifecycle Tracking#
Each vulnerability is tracked with complete timestamps:
- First detection: when it was found for the first time
- Last seen: when was the last time it appeared in a scan
- Auto-fix: if a vulnerability doesn’t appear in a subsequent scan, it’s automatically marked as “fixed”
- Reopening: if a vulnerability marked as fixed reappears, it’s automatically reopened
- History by scan: in which exact scans it was detected (complete audit trail)

State Management#
The available states are:
StateDescriptionOpenVulnerability detected and pending remediationFixedRemediated (automatically marked when it doesn’t appear in a new scan)Won’t FixDecision not to remediate (with justification)AcceptedRisk accepted by the organizationFalse PositiveIncorrect scanner detection
State operations can also be done in bulk to manage multiple vulnerabilities simultaneously.
CISA KEV – Known Exploited Vulnerabilities#
vScan integrates with CISA’s Known Exploited Vulnerabilities (KEV) catalog, which syncs automatically every 24 hours.
Each detected vulnerability is cross-referenced against this catalog. Those that appear there are flagged specially because it means that vulnerability is being actively exploited. Remediation priority should be immediate.

Catalog validation includes integrity verification: entry count, CVE ID format and JSON structure to mitigate malicious data injection.
Documentation#
vScan includes complete documentation in two languages:
| Language | Link |
|---|---|
| English | docs/en/ |
| Spanish | docs/es/ |
Conclusion#
vScan 2.0 transforms your Veeam backup infrastructure into a continuous security monitoring platform. Instead of waiting for an incident to discover vulnerabilities in your restore points, now you can proactively scan them, track the lifecycle of each vulnerability and make informed decisions before restoring.
The main features we covered in this post are:
- Native integration with Veeam VBR v13+ REST API
- Three scanning engines: Trivy, Grype and Jadi
- Comparison between scanners and restore points
- Batch scanning with configurable parallelism
- Scheduled scans with cron expressions
- Complete vulnerability lifecycle management
- Integration with CISA KEV (Known Exploited Vulnerabilities)
- Executive and technical PDF reports with branding
- CSV export up to 50,000 vulnerabilities
- Email and desktop notifications (6 event types)
- Security with AES-256-GCM, Argon2id, Keychain, biometrics
- Auto-lock, brute force protection, recovery key
- System tray with full menu
- Dark mode
- Automatic database maintenance
- Documentation in English and Spanish
The application is available on GitHub under the MIT license: https://github.com/mescobarcl/vScan
And with that we wrap up this post! Any ideas or suggestions are welcome as always!